Loomis vs Reilly vs Asaro: Which Head Method to Learn
Loomis vs Reilly vs Asaro compared. What each head drawing method actually answers, why the three are not rivals, and which one fixes your problem.
Ask which head drawing method to learn and you get the same three names back: Loomis, Reilly, Asaro. Ask which one is best and you get either a ranking or an order to learn them in.
Both answers miss something that makes the whole question easier. The three men were not offering competing solutions to one problem. They were working on three different problems, and two of them were taught by the same man. Once you know which problem each one solves, picking between them stops being a matter of taste and becomes a matter of diagnosis.
The short answer
This is what each one puts on a head.
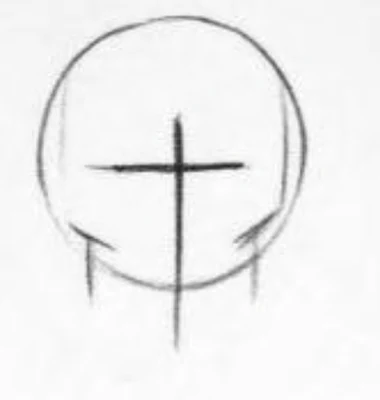
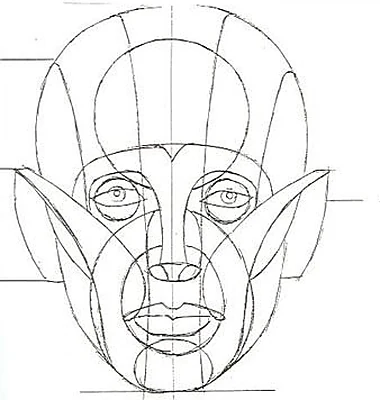
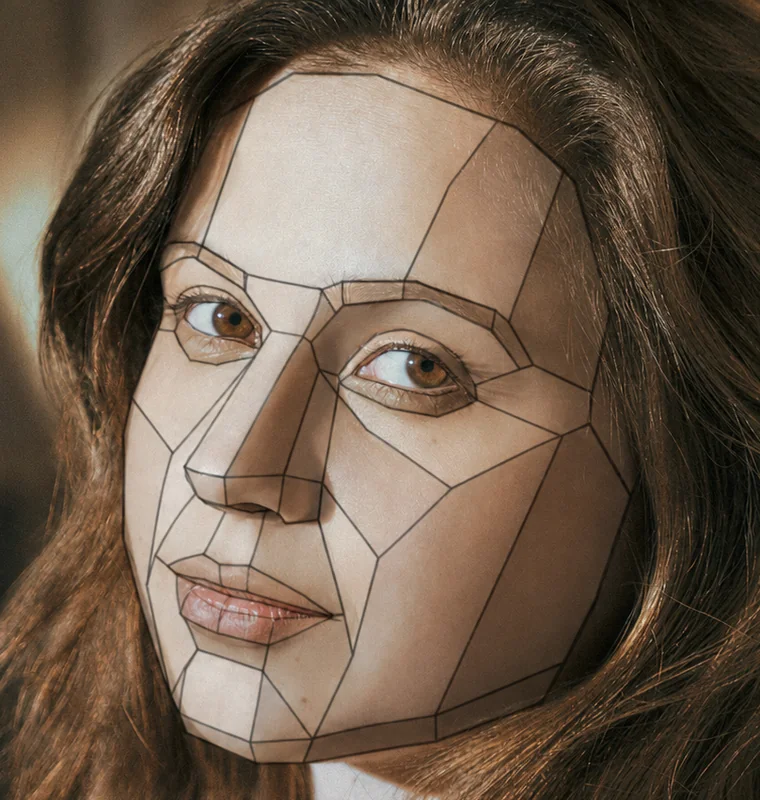
| Method | What it answers | What it will not do | Learn it when |
|---|---|---|---|
| Loomis ball and plane |
Where is this head in space, and are the features in the right places? | Tell you where the shadow starts on the face in front of you. | Your heads look wonky, or they fall apart at unusual angles. |
| Reilly the abstraction |
How do the parts of the face join into one form? | Give you an authoritative diagram to copy. He published nothing. | Your drawing measures correctly but looks stiff and assembled from parts. |
| Asaro planes of the head |
How do I simplify the head, so light and shadow become clear shapes? | Get you a likeness. It is one man’s head, not your model’s. | Your drawing is accurate but flat, or you cannot decide where shadow begins. |
If you only read this far: they are compatible, and you probably need one of them right now rather than all three.
Two of them had the same teacher
The rival-camps framing does not survive five minutes of biography.
Andrew Loomis studied at the Art Students League of New York under George Bridgman and Frank Vincent DuMond. Frank Reilly studied at the Art Students League from 1927 to 1931, in Bridgman’s drawing class, with DuMond for painting. When Bridgman died in 1943, Reilly took over his figure drawing class. John Asaro studied at the League as well, alongside his training at the Art Center College of Design in Pasadena.
Same school, in two cases the same teachers. What separates these men is not doctrine. It is which part of the job each worked hardest on, and what each left behind.
Loomis left books. A shelf of them, clearly written and full of diagrams. His construction system spread further than anyone’s, and “the Loomis method” came to mean one chapter of what he actually taught.
Reilly left almost nothing on paper. He taught at the League for twenty-eight years and died in 1967 without publishing his system, so everything in circulation was reconstructed from students’ notes. That is why versions of it disagree with each other.
Asaro left an object. A cast head with the surface cut into flat planes, sold since 1976. An object does not compete with a method. You put it on the shelf and it answers one question whenever you look at it.
The three are not equally documented, which is worth remembering when you read anyone’s comparison, including this one.
Loomis: getting the head pointing the right way
In Drawing the Head and Hands (1956) Loomis calls his construction the ball and plane method. His first two plates tell you the whole idea: the basic shape is a flattened ball, and then comes what he labels “the all-important cross on the ball”.
The ball stands for the cranium, flattened at the sides because the side of a real skull is flat there. Then you draw two curves round it, which Loomis names the middle line and the brow line. Those two curves are the method. Before a single feature exists, they fix how far the head is turned and how far it is tilted. The jaw hangs off the ball, proportional divisions place the features, and the drawing is built.
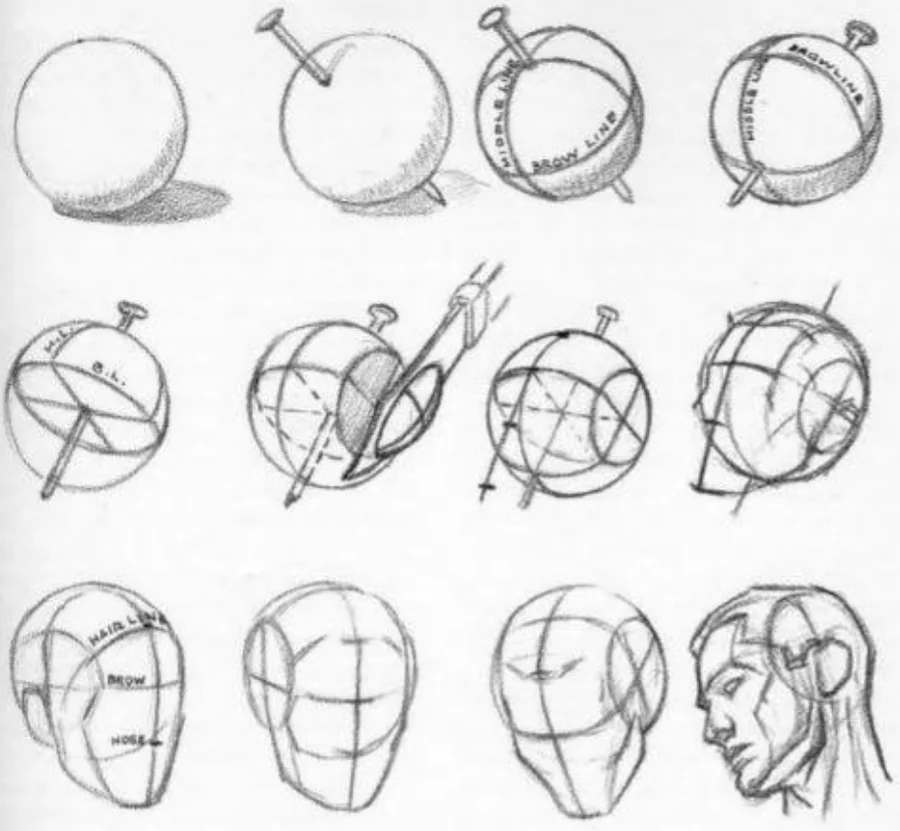
The reason artists keep coming back to this is in the bottom row above. Nothing has been observed yet, and the head already sits at a definite angle in space.
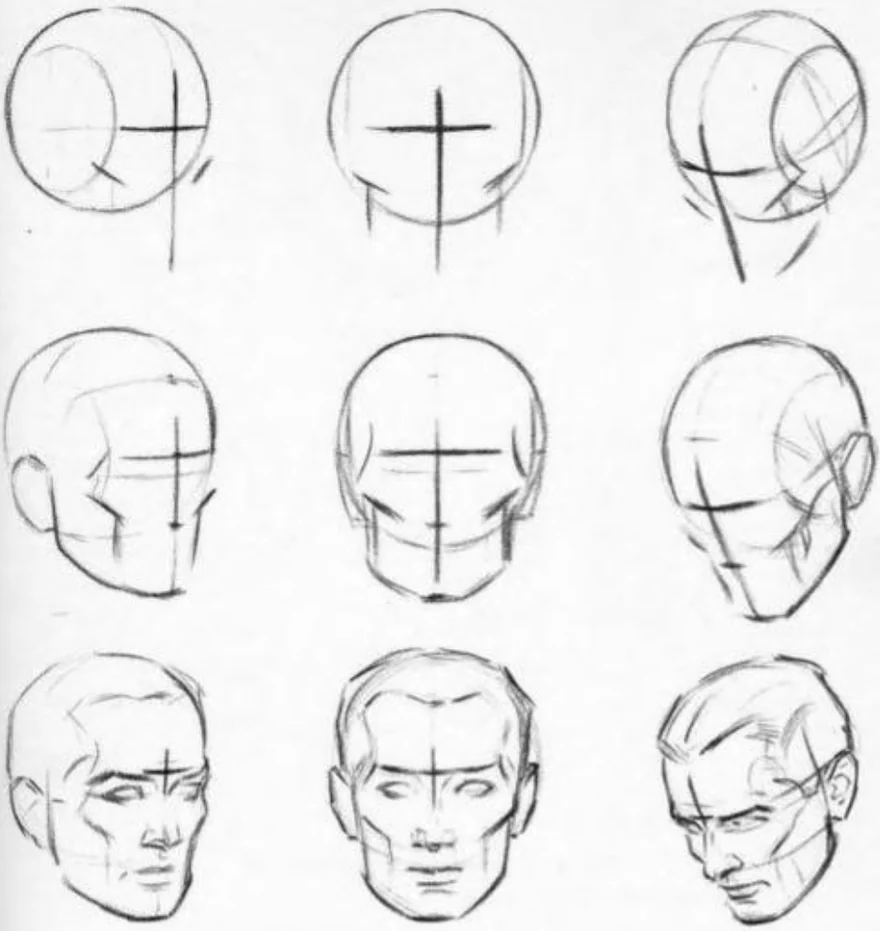
What Loomis was really solving was a working illustrator’s problem: draw a convincing head, at any angle, from imagination, with no model in the room. His system does that better than anything else on this page, and it is why generations of illustrators learned the head from him.
One correction, because the usual shorthand gets it wrong. People say Loomis is for construction and Asaro is for light, but Loomis wrote about light at length: the Form Principle in Creative Illustration (1947) names the same lit planes, halftones, shadows, cast shadows and reflected light an atelier names today. His limitation is geometric rather than a gap in what he taught. The ball is smooth, and a smooth surface cannot tell you where the light stops.
Reilly: mapping the head with rhythms
The drawing half of Reilly’s teaching is what people mean by the Reilly abstraction, and it is worth setting out properly, because most summaries of it are vague.
Loomis reduces the head to a ball and a cross. Reilly maps it in far more detail. The abstraction is a fixed layout of lines and curves that you memorise, then fit to whoever is in front of you, and it has three parts.
Proportional divisions. Start from a circle for the cranium, then divide the face into three equal parts down its length: hairline to brow, brow to the base of the nose, base of the nose to chin. Horizontal alignments then place the eyes, the sides of the nose and the corners of the mouth in relation to each other.
Ovals on the landmarks. The parts of the face that are rounded masses get drawn as rounded masses. Overlapping ovals and circles mark the eye sockets, the architecture of the cheek, the muzzle around the mouth, the ball of the chin. Boxes are the wrong shape for these, so Reilly does not use them.
Rhythm lines. Long sweeping curves running through and between those masses: temple into cheekbone, brow into the side of the nose, the jaw from below the ear round to the chin. Each one carries you out of one form and into the next rather than stopping at the edge of a feature.
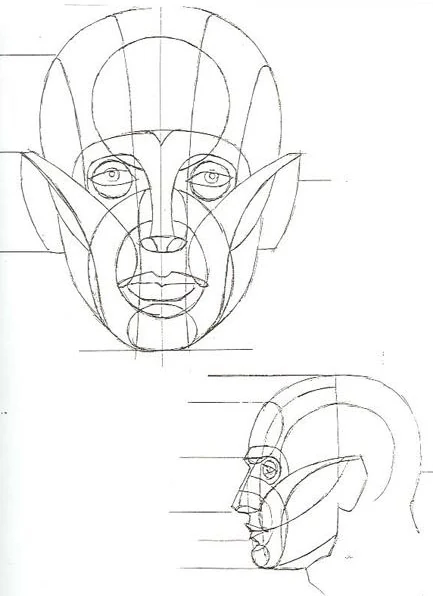
Seeing it laid out also shows how much there is to memorise, which is the honest cost of the system.
The rhythms are the part that matters, and the reason for them is unity. A head drawn feature by feature looks assembled from parts. A head built on rhythms holds together, because every landmark arrives on a line that came from somewhere else. That is also why illustrators and animators took to the system: once the abstraction is in your head, you can turn it to an angle you have never seen and the parts still relate correctly.
It is not the opposite of Loomis. Both start from a circle and proportional divisions. The difference is that Reilly’s map also carries anatomy and likeness, so it asks more of you before it pays off.
One warning, following from the fact that he published nothing: there is no authoritative version of the abstraction. The ones circulating descend from different students’ notes, Jack Faragasso’s among them, and they disagree in detail. Nobody can tell you which one Reilly would have signed.
Worth knowing before you go looking, too: “the Reilly method” can mean two things. He also built a controlled palette, nine neutral greys mixed in even steps and laid out before painting began, so the value ladder was settled before a lit model could confuse it. That is a painting system rather than a way of drawing the head, which is why some of what you read about Reilly turns out to be about paint and not about lines.
Asaro: simplifying the head into planes
John Asaro trained at the Art Center College of Design in Pasadena and at the Art Students League, spent twelve years in commercial art, then taught figurative painting at Art Center, where he developed the Planes of the Head. The cast has been sold since 1976 and now sits on studio shelves next to the classical casts.
It is not a drawing procedure like the other two. It is a simplification. Asaro took the anatomy of the head and rebuilt it out of flat, angled blocks, so a form covered in soft curves becomes a small number of surfaces, each one facing a single direction.
That matters because a plane’s value is set by its angle to the light. A plane square on to the light takes the full strength of it. Tilt it away and it takes less, and the further it tilts the less it takes, until it turns far enough to take nothing at all. Distance counts too, so with the light close to the model, the planes nearest it read lighter than the ones further back.
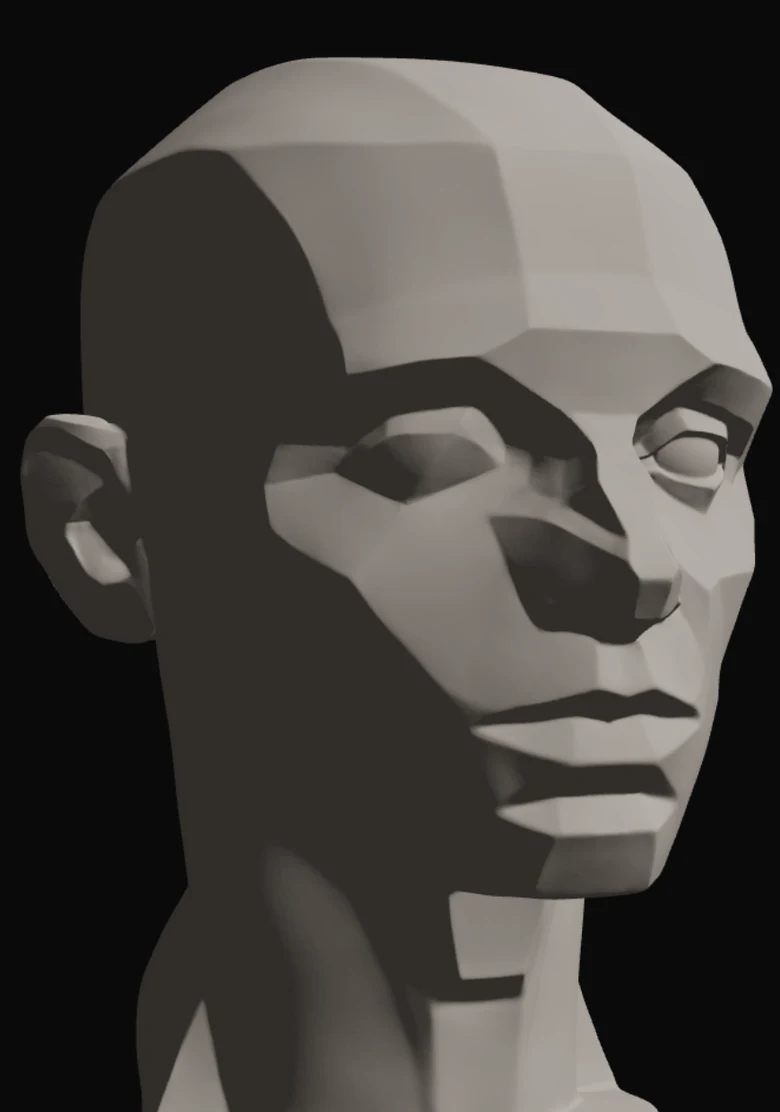
With the light above, as it usually is, that gives you a pattern you can rely on. The upward-facing planes take the most: the top of the forehead, the top of the cheekbone, the top plane of the nose. The vertical planes take much less, which is why the side of the head, the side planes of the nose and the flat of the jaw drop into halftone. The downward-facing planes take almost nothing, and they are where a head gets its darks: under the brow, under the nose, under the top lip, under the chin.
This is what is meant by the planes explaining the form. You are not drawing facets. You are using them to work out which parts of a face are light, which are halftone and which are dark, and once those shapes are right you can soften the whole thing back to skin.
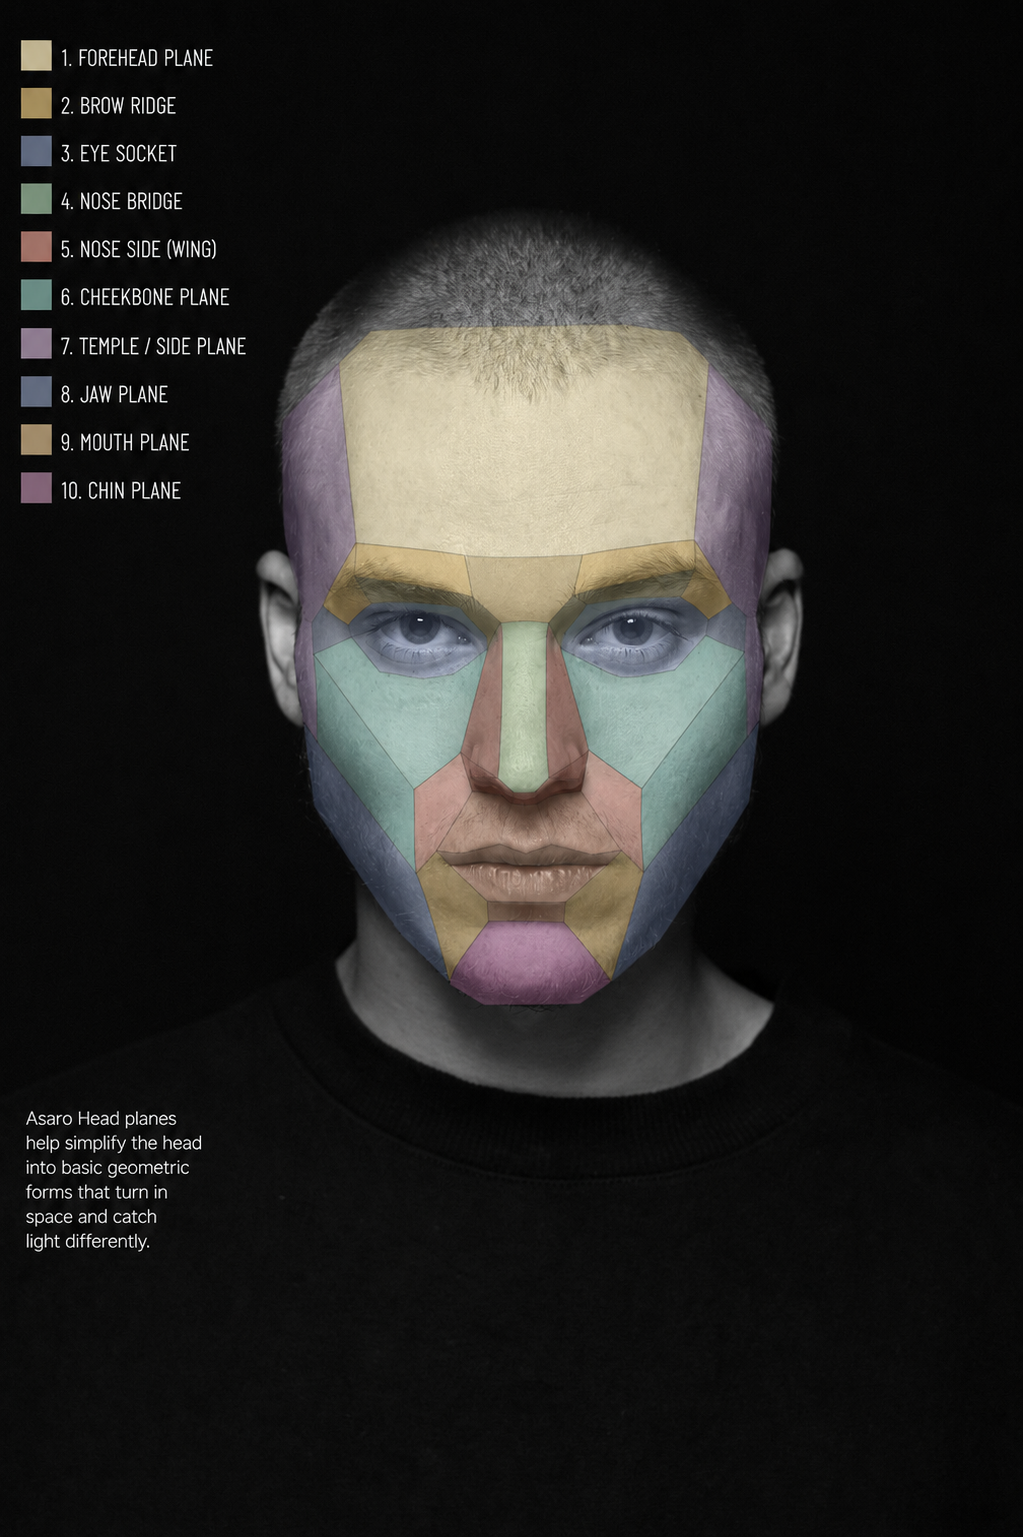
The full walkthrough of the groups and how to find them on a face is in the planar head explained.
Why it fixes flat drawings
Beginner heads look flat because they were built flat: an outline with the features arranged inside it, like a mask, then shading guessed at over the top.
Planes make that impossible. To give a plane a value you first have to decide which way it faces, and you cannot decide that without picturing a solid object turned a particular way in space. So the method forces you to think in three dimensions before you put down a single tone, which is the real reason it is worth studying even though no face has an edge on it anywhere.
Its limits are real too. It is one man’s skull, so it will never hand you a likeness, and the proportions are not your model’s. Beginners tend to add facets until the form is smooth and confusing again, which throws away the reason for using it. And a plane drawing is practice, never the finished picture.
Which one fixes your problem
Read this as a diagnosis rather than a curriculum. Work on the symptom you actually have.
- Heads come out wonky, or collapse the moment the angle is unusual. Loomis. Nothing else on this page is built to get a head pointing correctly in space from imagination.
- Proportions measure right, but the face looks stiff, and features look pasted on. Reilly’s abstraction. Unity is the problem it was designed for.
- The drawing is accurate and completely flat, or you stall trying to decide where shadow starts. Asaro. Then go and move a light around.
- You can draw a head but it never looks like the person. None of the three. That is observation, measured against the model, and no system substitutes for it.
If you are starting from nothing, learn Loomis first, because a head in the wrong position cannot be rescued by good shading. Add the planes when your drawings are correct and lifeless. Reach for Reilly when the problem is unity. Skipping straight to rhythms usually ends with graceful curves in the wrong place. And whichever you pick, it is a scaffold: all three are meant to disappear from the finished drawing.
The fastest way to test the planar head is to move a light rather than read about it. In Art Atelier you can turn a 3D planar head to any angle, orbit a studio light around it, snap to classic setups, then posterize the shading into flat value steps and watch which planes fall on which side of the line. Free on iOS and Android.
Related: the planar head explained for the plane groups in detail, how to see values like an atelier student for the value scale and notan habits, the structure of a classical drawing for the order of work once you’ve chosen a method, and simultaneous contrast for why your eye misjudges value in the first place.
Practise this in Art Atelier
Orbit a studio light around a 3D planar head, snap to classic presets, and posterize the values into a notan. Free on iOS & Android.
Download the app